Startups looking to grow in today’s fast-paced digital landscape must embrace effective tracking and data collection methods. One approach gaining popularity is server-side tracking, which surpasses traditional client-side tracking in various ways.
During this webinar, I am going to provide insights and practical techniques for enhancing tracking methods through server-side tracking.
Let’s delve into the benefits of server-side tracking, such as improved attribution and site speed, and guide you through the implementation process using Google Tag Manager.
By harnessing this potent and user-friendly technique, you’ll elevate your data collection and analysis capabilities to new heights.
Prepare yourself for a transformative experience!

Benefits of Server-Side Tracking
Server-side tracking offers several benefits for startups to enhance data collection, analysis, and website performance.
By shifting the tracking process from the client’s browser to the server, it provides a more reliable and efficient method of gathering user data.
One of the key advantages of server-side tracking is increased data accuracy. Ad blockers and privacy tools can hinder data collection, resulting in incomplete or biased data sets.
In contrast, server-side tracking overcomes these obstacles, ensuring startups receive more precise and comprehensive data on user interactions and behaviors.
Another benefit of server-side tracking is improved site speed. Client-side tracking can negatively impact site performance since browsers need to process multiple tracking scripts, causing slower page load times.
By moving the tracking process to the server, startups can optimize their site performance and deliver a faster, smoother browsing experience for users.
Server-side tracking offers startups a higher level of control when it comes to sharing data with third-party tools and platforms. Instead of sending all the data, startups can choose specific data points to be sent to different marketing and analytics tools. This selective approach ensures that the right information reaches the appropriate destinations.
This level of control is crucial for maintaining data privacy and complying with regulations such as GDPR and CCPA.
Lastly, server-side tracking enhances attribution by providing a comprehensive view of user interactions across various devices and platforms. It captures accurate data from multiple touchpoints, enabling startups to gain a deeper understanding of the customer journey and optimize their marketing strategies accordingly.
Compared to traditional client-side tracking methods, server-side tracking offers several advantages. It provides more accurate data, improves site performance, and grants greater control over data sharing.
By leveraging server-side tracking, startups can make more informed data-driven decisions and enhance their overall marketing effectiveness.
Implementing Server-Side Tracking with Google Tag Manager (GTM)
You can greatly enhance your website’s attribution and site speed by implementing server-side tracking using Google Tag Manager (GTM).
To make the most of the advantages offered by server-side tracking and optimize your data collection process, simply follow the steps outlined below:
Provision a GTM server
- Create a Google Cloud Platform account
To begin implementing server-side tracking with GTM, the first step is to create a Google Cloud Platform (GCP) account. GCP provides the necessary infrastructure for running a GTM server. Simply sign up for an account using your Google credentials, and you’re ready to proceed.
- Set up billing
Ensure that your GCP account has proper billing set up. Server-side tagging involves costs for server usage and traffic, so you need to have a valid payment method on file. Follow GCP’s billing setup instructions to ensure your account is ready for server-side tracking implementation.
- Provision a GTM server
Now that your GCP account is established and billing is sorted, it’s time to provision your GTM server. Follow the steps provided in Google’s documentation to deploy a GTM server container on the Google Cloud Platform. Once you complete this process successfully, you’ll have a fully functional GTM server ready for server-side tracking.
Set up a custom domain
- Create a custom subdomain
To add a personal touch and maintain brand consistency in your server-side tracking implementation, create a custom subdomain. This subdomain will point to your GTM server. Using your domain registrar’s control panel or dashboard, create a new subdomain that aligns with your branding and website’s naming conventions.
- Add CNAME records
After creating your custom subdomain, add CNAME records to your domain’s DNS settings. These records will direct your subdomain to the GTM server you provisioned earlier. Consult your domain registrar’s documentation to ensure the correct configuration of CNAME records.
Update Google Tag code
- Modify the website’s Google Tag code
To ensure the proper functioning of server-side tracking, modify your website’s Google Tag code. Update the code to reference the new server-side tagging URL instead of the default https://www.googletagmanager.com address.
- Reference new server-side URL
Replace the default URL in the Google Tag code with your custom subdomain created in the previous step. This ensures that your tags are processed by your new GTM server, enabling you to benefit from server-side tracking advantages.
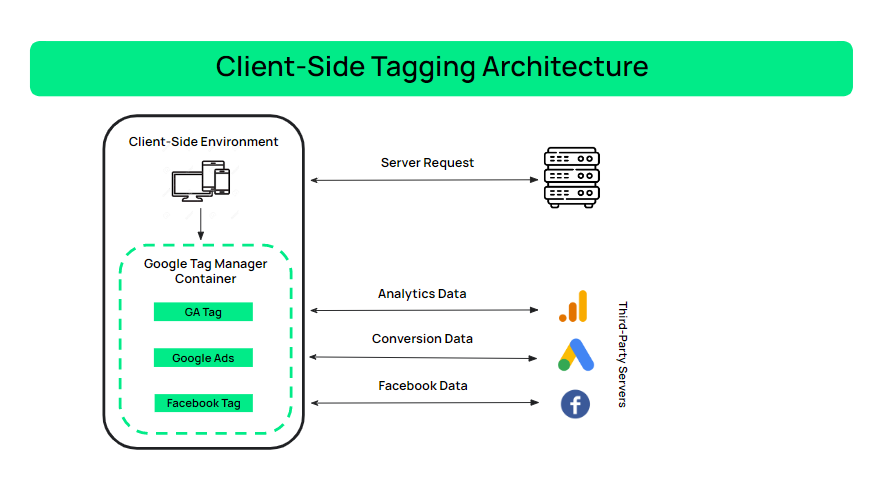
Collect client-side data
- Configure the website’s tags (e.g., GA4 or UA)
To collect client-side data, configure your website’s tags using your preferred analytics setup, such as GA4 or Universal Analytics (UA). This will enable the collection of valuable data from your website visitors, which can then be sent to your server-side setup for further processing.
- Send data to server-side setup
Once your client-side tags are configured, direct the collected data to your server-side setup. This is achieved by adding a transport URL to your tags, ensuring that all the data collected is sent to your GTM server.
Fire server-side pixels
- Configure server-side setup
With the data now being sent to your server-side setup, configure the GTM server to process the information and determine which data points to send to your desired platforms. This can involve filtering, enriching, or transforming the data as needed.
- Send data to desired platforms (e.g., Google Analytics, Mixpanel, Amplitude)
After configuring your server-side setup, send the processed data to your chosen platforms, such as Google Analytics, Mixpanel, or Amplitude. This allows you to leverage server-side tracking benefits while still utilizing your preferred analytics tools.
Embracing the Future of Analytics with Server-Side Tracking

Server-side tracking has numerous advantages over traditional client-side tracking methods. It enhances attribution and site speed, enabling you to gain better insights into your website’s performance and user behavior. This, in turn, empowers you to make more informed decisions and optimize your growth strategies.
If you want to take control of your data collection while ensuring compatibility with your preferred analytics tools, implementing server-side tracking with Google Tag Manager is a powerful solution.
To delve deeper into the realm of server-side tracking and fully grasp its benefits, I highly recommend watching the webinar about server-side tracking hosted.
It offers valuable guidance on how to implement server-side tracking and provides data-driven examples that effectively illustrate its effectiveness.
Don’t hesitate to embrace the future of analytics with server-side tracking and unlock the full potential of your website.